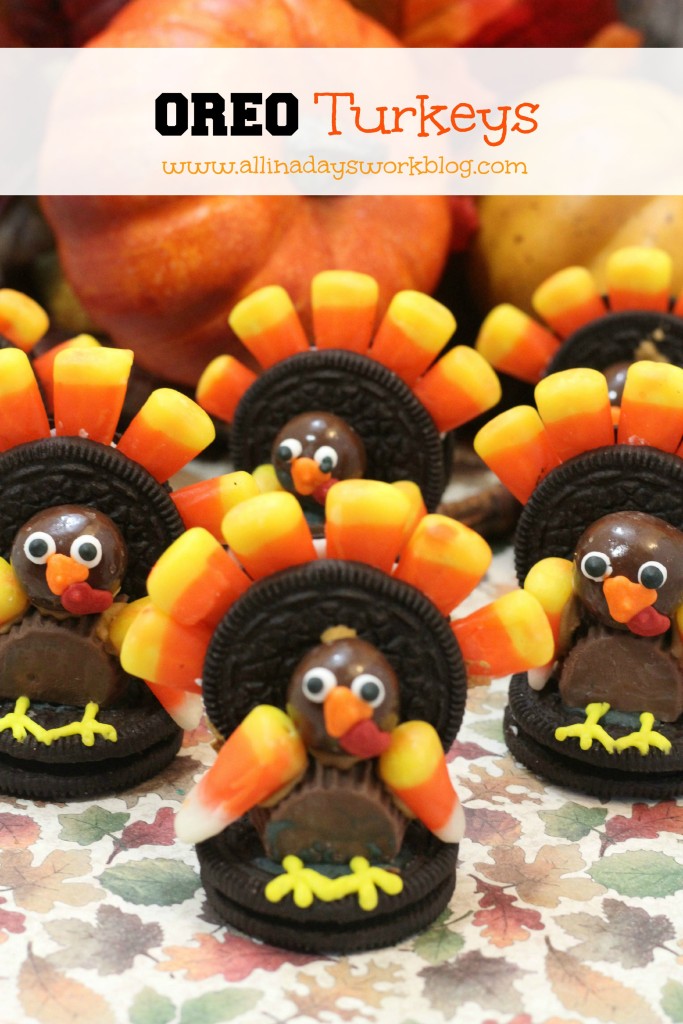
Oreo Turkey


oreo_turkeys

Turkey Ingredients: 

Package of Original Oreo cookies
Package of  Whoppers chocolate malt balls
Package of mini Reese’s peanut butter cups
Package of candy corn
Mini candy eyes
Royal icing, yellow, orange, and red

Icing Ingredients:

2 egg whites
1 C powder sugar
1/2 tsp cream of tartar
Yellow, orange,tan, and red gel food coloring

 Icing Directions:

-Combine all ingredients in a mixing bowl mixing on medium speed for 4 minutes. (except your food coloring)
-If icing is  not stiff enough add 1/4 C powder sugar.
-Divide the icing into 5 small bowls.
-In the first bowl add several drops of red gel food coloring. Stir to mix.
– In the second bowl add several drops of tan gel food coloring. Stir to mix.
– In the third bowl  add several drops of orange gel food coloring. Stir to mix.
– In the fourth bowl add several drops of yellow gel food coloring.  Stir to blend.
-In the fifth bowl, keep this bowl of icing white.
-Spoon each color of icing into individual  frosting bags with a #2 tips.
-Twist the open end of the bag to push the icing to the tip.

Turkey Directions:

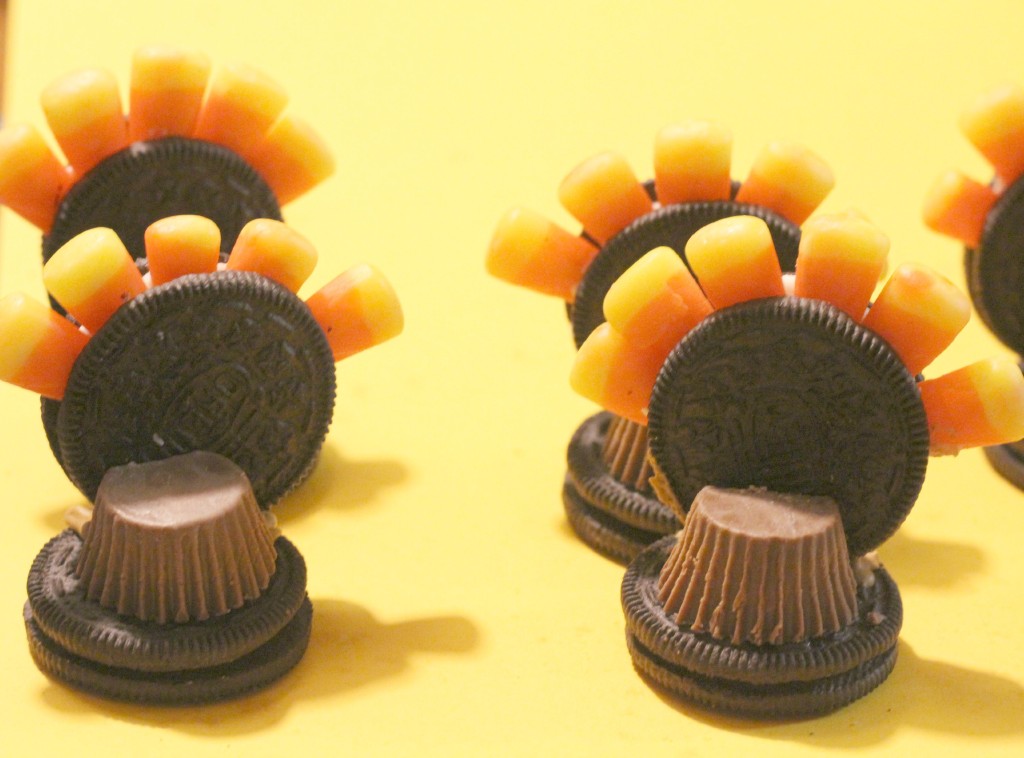
-Refer to the picture of the Oreo turkeys when assembling your own turkeys.
-The directions for the turkey will depend on how many Oreo Turkeys that you will be making.
-For the tail fan, you will separate an Oreo into two pieces in order to make the tail feathers (candy corn) keeping the filling in these cookies.
-Using the white royal icing as”glue” apply thick layer of the white icing on the bottom of the separated  Oreo cookie.
-Begin to lay the candy corn on the white icing with the  white end of  the pieces of the candy corn on the inside of the  cookie arranging each piece of candy corn next to each other.

Oreo turkey inprocess 2
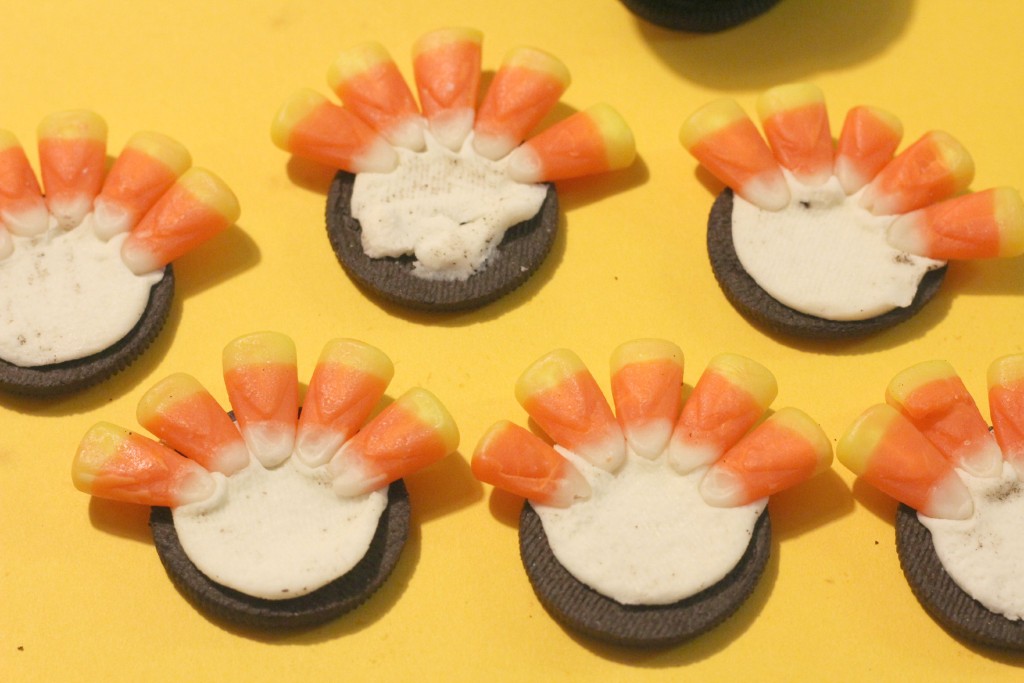
-Arrange the candy corn in a half circle on the separated Oreo cookie.
-Lay the top half of that Oreo cookie on top of the bottom half of the cookie (the one with all of the candy corn on it).  If needed apply more white icing as glue.
-Allow time for these to dry. Set aside.
-Take out the mini Reese peanut butter cups.  Cut about 1/4 of the cup off allowing the candy to sit flat on another Oreo cookie. (These Oreo cookies will be the base of the turkeys).
-Use the tan icing as the “glue” to hold the cut Reese peanut butter mini cup to the Oreo cookie.
-Allow the “glue” to dry.  Set aside.

Oreo turkey inprocess 3
-Check on the tail fan to make sure that it is dry.  If it is then glue(with tan icing) the “whooper” to the tail fan.  The whooper will be the head of the turkey. Set the tail fan down when gluing the head on it.
-Allow for the head  to dry completely.
-Apply the mini candy eyes to the head (the whooper) of the turkey, then using the orange icing add a small nose.  Allow the nose to dry for about 30 seconds.  When the nose is dry add the red waddle with the red icing.  Allow time for this to dry also about 30+ seconds.
-Set aside for until all of the turkey heads are complete.

Oreo turkey inprocess 4
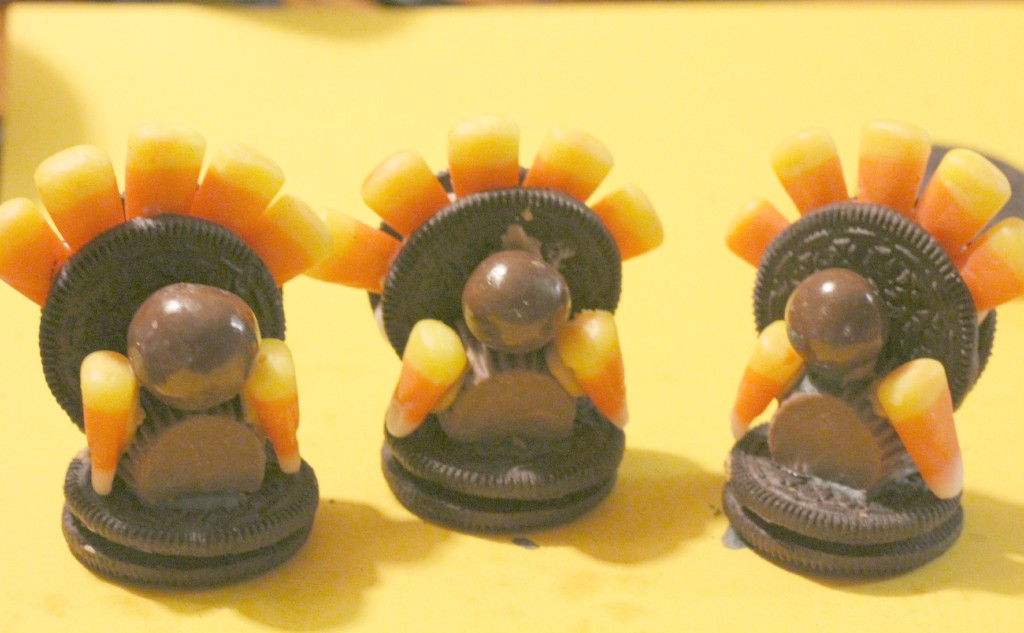
-Using the tan icing (a thick layer of icing) sit the turkey tail fan on the bottom Oreo cookie (the base). Lend the entire turkey creation against a filled bottle, jar, can or something else heavy until this drys.  This may take several hours.  Make sure that you place this someplace where it will not get moved or bumped into.
-After this has dried add the two pieces of candy corn with the white pointing down and outward for the turkey’s front legs.  Allow time for the icing (glue) to dry.
-Using the yellow icing draw the turkey feet on the bottom cookie by making a small line and adding two shorter lines pointing outward.
-Allow at least one hour for the completed turkey and all icing decor to dry.

Turkey oreo 6-1

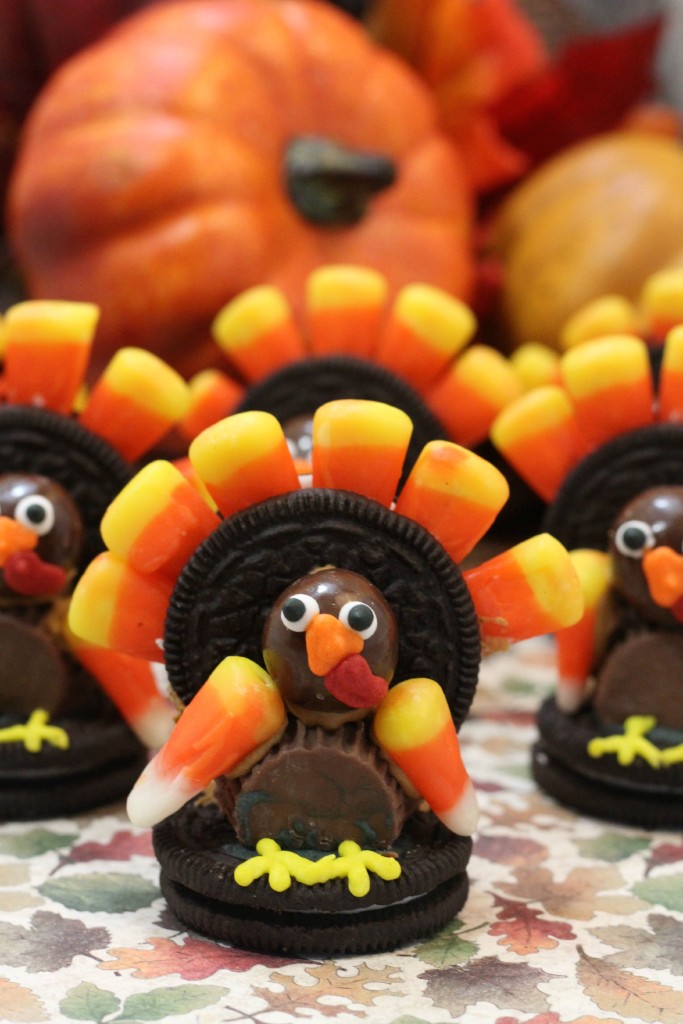
-Always refer to the picture for more instruction.


Posted in Holidays, Recipes | Leave a comment

Quick & Tasty Recipes for the Holidays

This is a sponsored conversation written by me on behalf of Pillsbury. The opinions and text are all mine.


Though I am not a big fan of the cold weather, I absolutely love the holidays. I love getting together with family and friends, and of course enjoying delicious food (it’s our time to splurge right?) While I enjoy eating all the delicious homemade meals and baked goods, I do not enjoy spending hours in the kitchen while the rest of the family is enjoying time together playing games, watching movies, or just catching up. So my goal for the holidays is to have great recipes that are delicious and easy. If I have to spend over 30 minutes on one dish, then it’s just too much. I want to play with the kids, and laugh at my Dad falling asleep on the couch with everyone else.

Two of my favorite recipes that are a big hit with the family (and all ingredients are easy to go and pick up at Walmart) so it makes it a double win for me. The first recipe is my Pillsbury Crescents® Nutella Rolls. These are super easy to make, and are a huge hit with everyone in the family. You can even  make them ahead of time (like the night before) and put them in the refrigerator over night.

Nutella_rolls_step_1
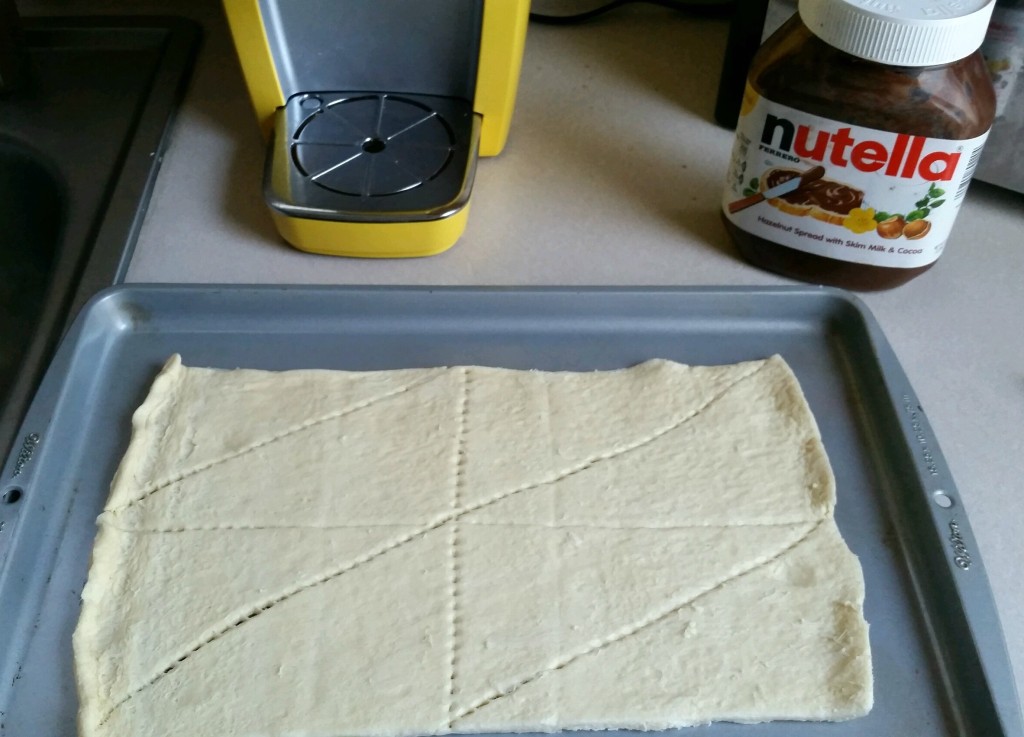
This is super simple -just roll out the rolls flat and spread Nutella all over the entire rolls, all the way to the edge.
Nutella_rolls_step_2
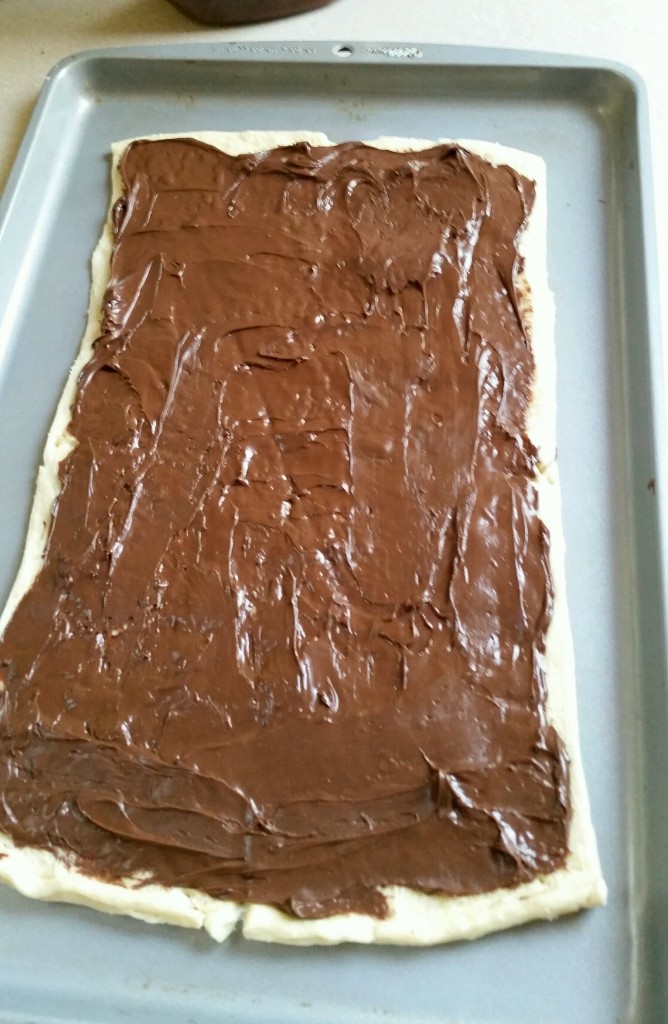
Then roll them back  up, and cut.
Nutella_rolls_step_4
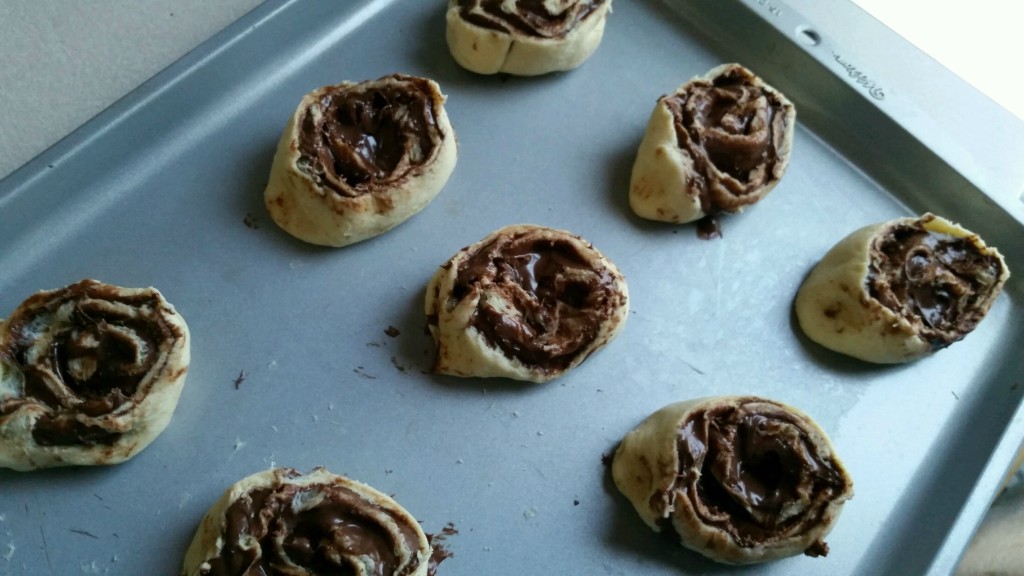
Bake for 8-10 minutes at 400 degrees. Seriously they are that simple. The Nutella is rich enough that you  don’t need any type of icing or additional ingredients, and they actually reheat pretty well too. These were a big hit with everyone, especially some of the kids who weren’t big fans of cinnamon rolls.
Nutella_Breakfast_rolls
Now my next recipe is a bit more in depth, a few more steps, but still super easy and quick. It’s called Bubble-up Cheesy Chicken. There are 2 versions that I make, one that is a bit spicy (more for the adults) and a mild version. The other thing is if you are looking for recipes to use all that leftover turkey with – well bubble-up cheesy turkey works just as well!
bubble_up_chicken
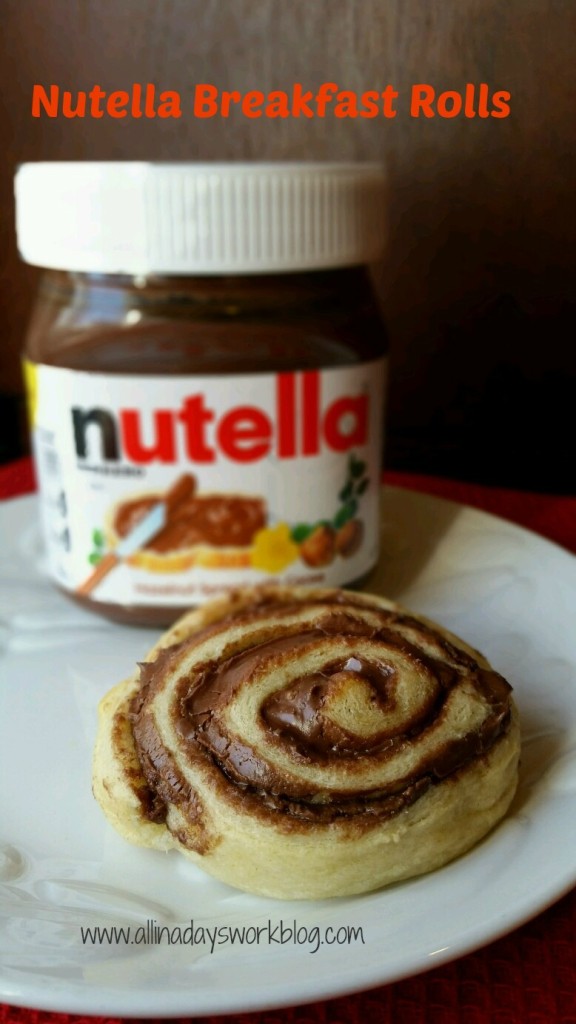
You will need one package of Pillsbury Grands Biscuits, 1  can of Cream of Chicken, 1/2 block of Velveeta cheese, baked chicken (or rotisserie chicken) a can of Rotel tomatoes with green chilis (leave this out if you are making it for picky kids or anyone who doesn’t like some spice)and then some onion and garlic powder.
bubble_up_before
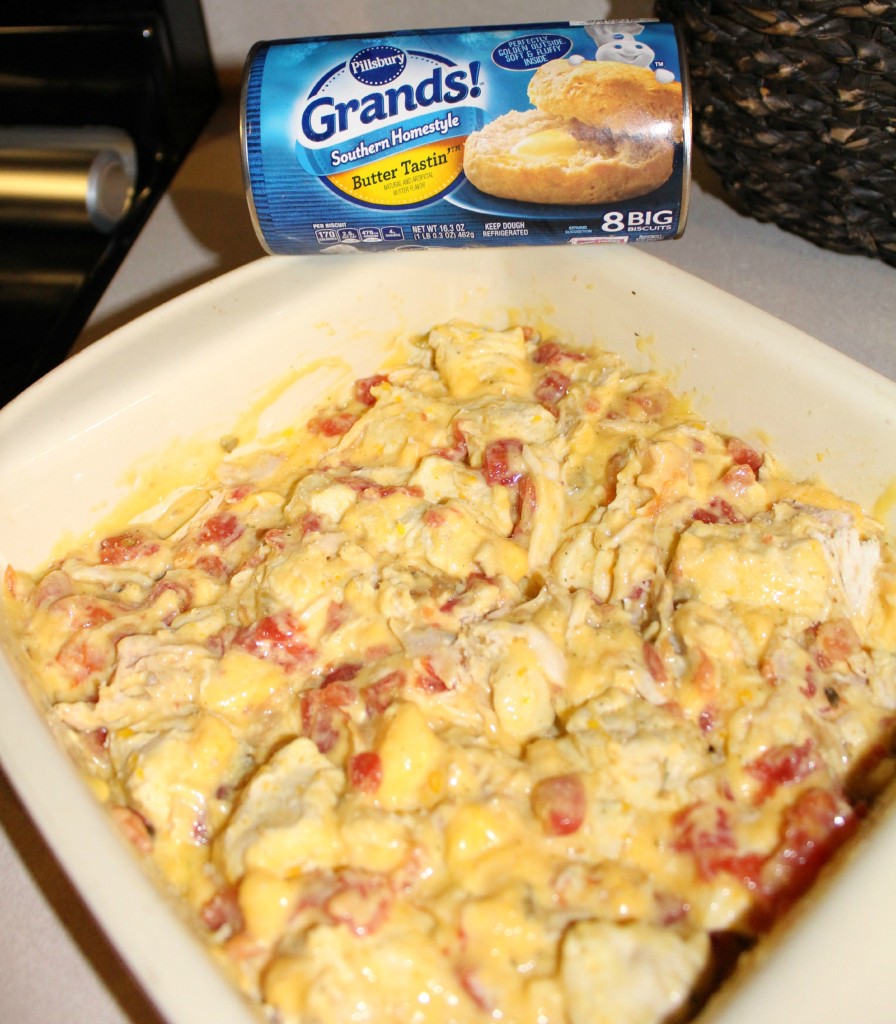
First, shred the chicken and set aside.
Next, you will cut up the Velveeta cheese, and melt in a microwave safe bowl until melted.
Add cream of chicken soup, 1/2 tsp garlic powder and 1/2 tsp onion powder, mix well and put back in microwave for another 60 seconds.
Add rotel tomatoes along with shredded chicken and stir.
Put into well greased pan.
Cut each Pillsbury Grand Biscuit into 1/6’s and place into mixture.
Optional: sprinkle garlic salt onto  top of biscuits
Bake at 350 for 30-40 minutes.
bubble_up_chicken_plated
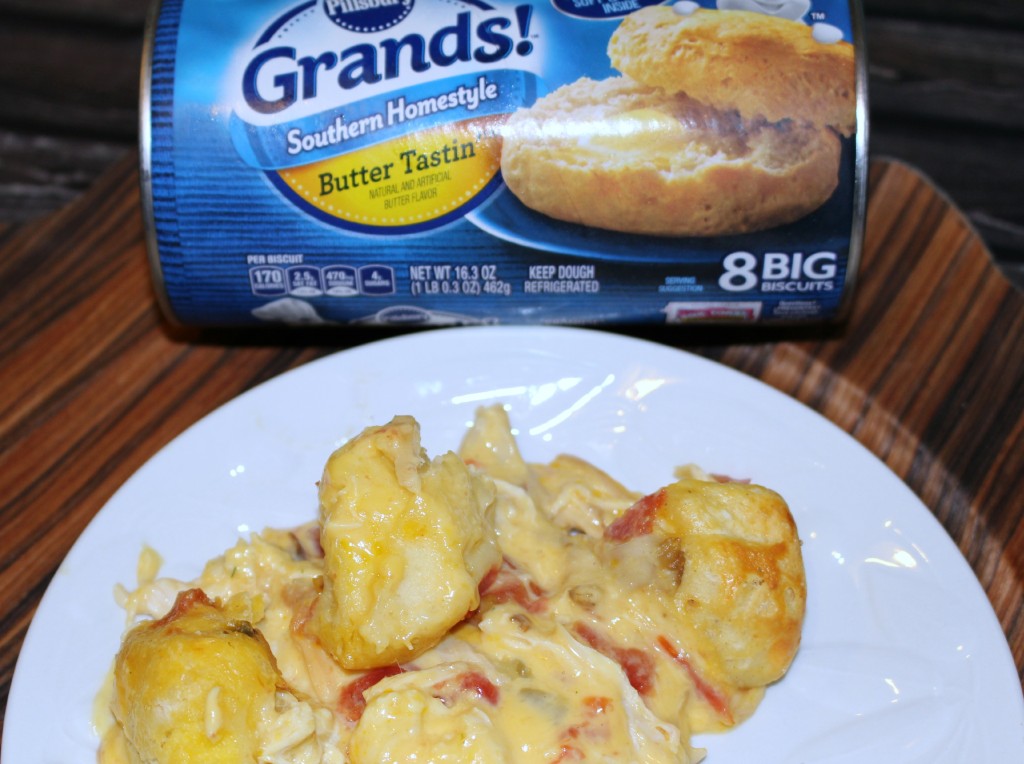
If you decide to serve the spicer version, you can serve with a side of mexican rice. If you serve the more kid-friendly version I like to add a veggie, and the kids always love regular chicken flavored rice as well.

This year I plan to add a few more quick meals to my menu – what are your go to quick and easy holiday meals?

This is a sponsored conversation written by me on behalf of Pillsbury. The opinions and text are all mine.

Posted in Holidays, Recipes | 3 Comments

Kids and the Internet: Where do You Draw the Line?

Tracking Pixel

This is a sponsored post written by me on behalf of Torch.

Parenting is rough. There are so many obstacles that you face with your children on a day to day basis it can get pretty overwhelming. It’s nice to be able to talk to your parents, grandparents and others to give you sound-bits and advice on what they’ve already been through – on whats worked, and what hasn’t. But when it comes to technology, and your kids uses and freedoms of it, well this isn’t a topic that they can help with. This is an all new chartered territory that unfortunately our parents can’t give us advice on. Setting up rules and regulations for internet usages, the do’s and the don’ts can be a bit overwhelming. That’s why I’m excited to see programs like Torch launch to help give the power back to the parents.Torch

Torch is a router with parental tools that allow you to filter content, limit usage during certain times, and gives you reports on what your kids are doing online. Torch not only allows you to set healthy boundaries for your children online, but keeps them accountable for the sites they visit, and the length of time they spend online.

Here’s a few main reasons why I love Torch ,and would recommend it to family and friends:
Limited Screen Time. Set a screen time limit for internet usage for each child – we all know time gets away from us, but having limited screen time helps balance their lives so they aren’t spending all their time online. It also helps a ton with time management, because they get done what has to be done first since they know its limited!

Pause. If the kids need to eat dinner, take out the trash or let the dog out, they don’t have to worry that they are missing out on their internet time. The pause button allows them to pick up the time from where they left off – causing less arguments and fits when they need to do something else.

Content Customization.  Restrict and block certain websites based on content – no need to worry about your kids exploring the internet and ending up on the wrong website.

Internet Bedtime. My. Absolute. Favorite. If you have kids like mine every single time I tell them it’s time to get off line I hear, “I’m almost done.” , or “just one more level”, or “the video is almost over!” The internet bedtime gives them a countdown so they are well aware of the time remaining – and shuts down immediately at bedtime. No fighting and arguing with the kids about getting offline – bam! It’s done.

torch_router

Check out all that Torch has to offer and allow your kids the freedom to search the internet – all while keeping them safe!


This is a sponsored post written by me on behalf of Torch.

Posted in Techy | Leave a comment

Making Presentations POP with Knovio Pro

This is a sponsored post written by me on behalf of Knovio for IZEA. All opinions are 100% mine.

As many of you know, blogging is not my full-time career. For nearly ten years I’ve worked as an licensed insurance agent for a well known insurance provider. My two primary responsibilities are sales and marketing, which I do from a satellite office (meaning my boss is actually in a different location, which at times can be a blessing). There are many times when I have marketing and sales ideas to implement in our office that I have to travel to his because it’s a bit too difficult to explain over the phone or just in an e-mail, or even a powerpoint presentation. Time is money, so taking the time to drive there, sit with him and review, and drive back – well that’s wasting precious time!

Knovio4.jpeg

That was until I discovered Knovio. Knovio is one of the easiest and most creative way to create multimedia content –  it’s easy as uploading your PowerPoint slides, images, PDF’s and you can even record video and audio commentary (my absolute favorite part) to share with whomever you want. (I’m not sharing my marketing plan that I created,but giving you a step-by-step that I am creating for a media kit for my blog). One of the key features is you can even download the app and create presentations on your phone!

Knovio.jpeg

There are a lot of things to love about this program, but being easy to use would probably be my favorite. I am not completely illiterate when it comes to apps and programs, but I’m definitely not a computer whiz either. There have been a ton of programs and software that I have gotten rid of simply because I either didn’t have the patience (or time) to learn it, or it just proved to be that difficult. If you are somewhat familiar with PowerPoint, using Knovio will be a piece of cake.

Secondly, another favorite that competes with the ease of use, is the option for video/sound capabilities. This is the tool keeps me from traveling to multiple sites and spending valuable time where I could be more productive – it allows me to reach multiple locations and people all at once!Being able to voice my ideas, (and yes video as well, because well, I love hand gestures) gives me the freedom of making my presentation virtually flawless with the ability to edit and correct the video/audio errors and re-record (sure can’t do that in person).

Knovio isn’t just for someone in sales and marketing – Knovio can be used for pitching an idea, enhancing your resume, practice a speech, document your travels, illustrate a process, tell a story, even create lesson plans (which I think would be great for virtual students, or even homeschoolers).

Knovio3.jpeg

I lovethe PRO version of Knovio which is completely worth it for the extra features. It has a KnowledgeVision’s Ask App which enables you to create a multi-part, multi-question quiz an assessments that you can add to any Knovio presentation. It also has a Guestbook which makes it possible to ask everyone to ‘sign in’ so you can track and score individuals, and a SCORMconnect system which allows you to integrate your presentations into a SCORM- based learning management system. (again perfect for teachers, lesson planners, homeschoolers, and even employers!) Try Knovio Pro


Knovio2.jpeg

Kovio is so confident in their program that they are offering a FREE 14 day trial of their basic service – and the ability to upgrade with easy monthly, quarterly or annual payments for the service..and there are so many reasons to subscribe:

  • Three easy steps to create a Knovio

  • Unlimited presentations

  • Available 24/7 from anywhere in the world

  • Easily correct mistakes and flubs with a unique no-record capability

  • Share it by email, website, or social media

  • PowerPoint animations supported

  • Export hi-def 1080p video files

  • A full library of customizable design templates

There’s still quite a bit of work I want to do on my final Knovio presentation; I’m pretty sure I could work on it for hours to try and get it just right – mostly re-recording the video and audio. I completely love this program, and cannot wait to send my first virtual pre-recorded presentation to my boss and marketing team. I also think that my virtual Media Kit for my blog will definitely impress PR agencies and put me leaps and bounds ahead of the competition.

What would you use Knovio Pro for?

Visit Sponsors Site

Posted in Money Matters, Reviews/Giveaways | Leave a comment

Jenny Craig Starter Pack now Available Exclusively at Walmart

I was provided a free Jenny Craig Weight Loss Starter Kit. However, the opinions expressed are entirely my own.

When it comes to weight loss, the biggest struggle I have (and those I’ve talked to about the struggles of losing weight) is food. The hard thing about food is it’s not like other things that you might be addicted to that you just cut out of your life altogether – you have to learn your boundaries. What causes your triggers for overeating, learning to eat the right (healthy) foods that are nutritious and filling.

If you’re like me you have always wanted to have someone do the cooking and preparing for you; imagine not having to worry about counting calories, carbs and fat grams. Planning breakfast, lunch,dinner and snacks. That alone can be stressful. That’s why I was so excited to try the the 3 Day Jenny Craig starter kit, available exclusively at Walmart now.

jenny_craig_starter_kit

Like so many other things I’ve wanted to give Jenny Craig’s food plans a try, but let’s be honest – not everyone wants to spend a ton of money on a month worth of food that they don’t even know if they will like. So this Starter Kit is the perfect way for you to try it out, and get a head start on your weight loss plan.

jenny_craig_starter_kit_meal
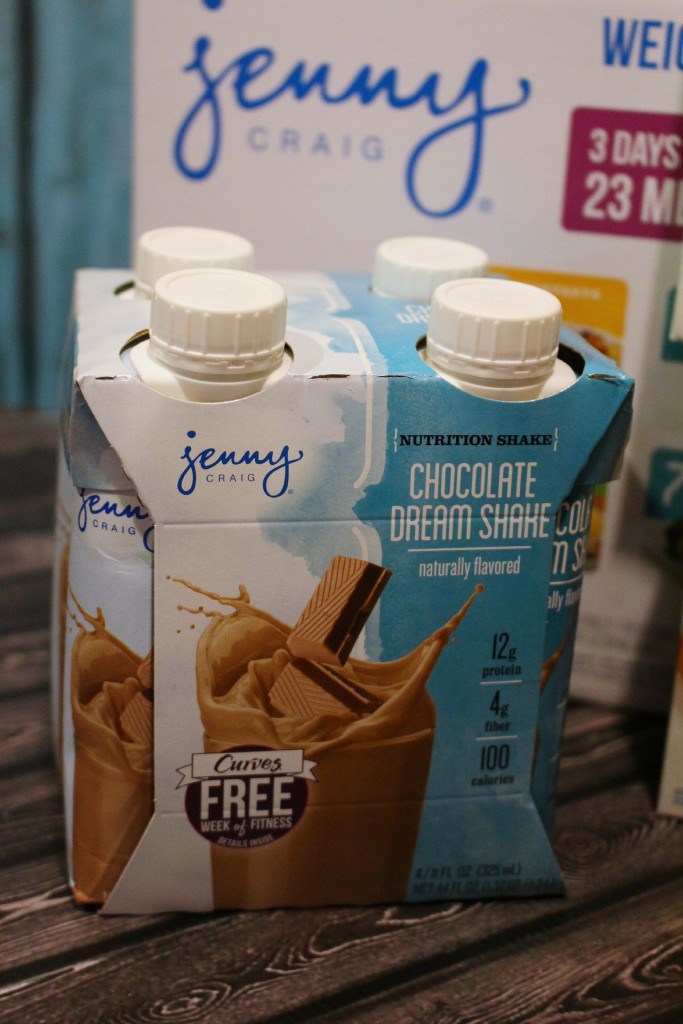
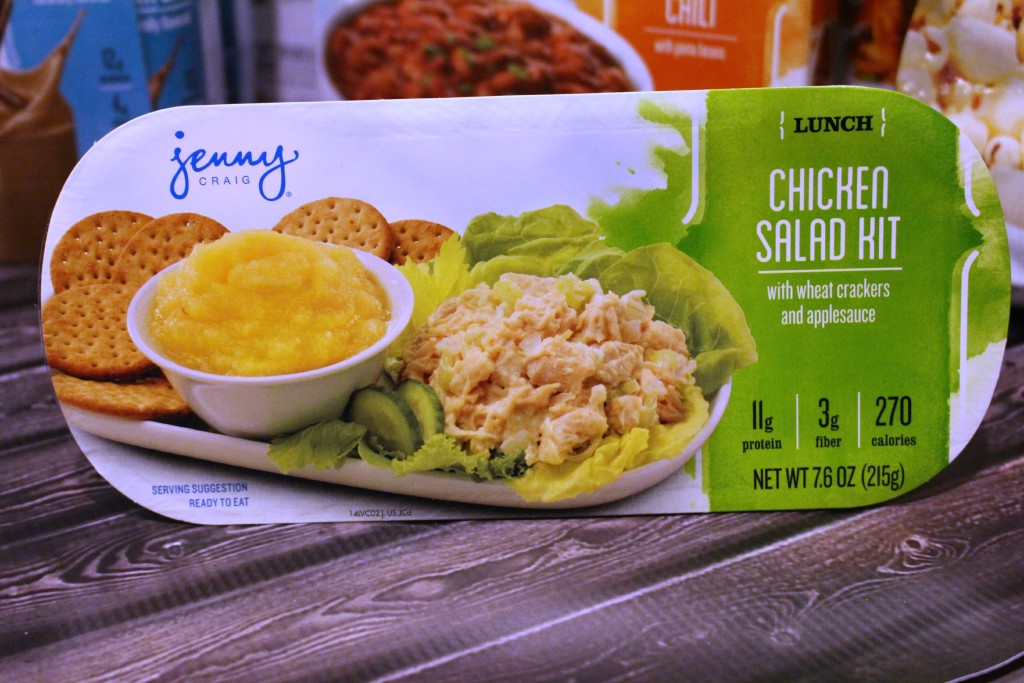
The Jenny Craig 3 Day Starter Kit comes with 3 days worth of food – breakfast, lunch, dinner, and a snack as well as dream shakes and some anytime bars for when you are feeling extra hungry.

Also included in the kit is a free initial personal one-on-one consultation at any Jenny Craig center. You also would receive a special $50 food savings coupon when you join Jenny Craig!

I really like the Jenny Craig Dream Shakes  which is a protein and fiber enhanced shake with essential vitamins and mineral, perfect for after a work out. The Starter Kit comes with 4 shakes for you to try!

jenny_craig_dream_shakes

I also love the Chocolate Peanut Butter Anytime Bars. A rich, creamy, peanut butter snack bar with crunchy soy crisps covered with creamy chocolate. A delicious bar that serves as one milk replacement, as well as a vitamin and mineral supplement to complement your Jenny Craig Menu. Each bar contains 4g fiber and 10g protein. 7 bars per box.

jenny_craig_anytime_bars

Be sure to head to Walmart today to check out the #JennyCraigKit you can find it in the diet/weight loss isle! 

jenny_craig_2

Posted in Fitness/Health | 23 Comments